MNN推理引擎初体验(一)
背景
MNN是一个高性能、轻量级、通用、易用的深度学习框架,支持深度模型推理与训练,尤其在端侧的推理与训练性能在业界处于领先地位。
本文记录下实操过程。
初体验
demo编译
下载代码:https://gitee.com/mirrors/mnn
Linux编译:
cd path/to/MNN

# 生成 schema ,可选
cd schema && ./generate.sh

# 进行编译
cd path/to/MNN
mkdir build && cd build
cmake -DMNN_BUILD_DEMO=ON ..
make -j8
结果
[ 97%] Built target rasterDemo.out
[ 97%] Linking CXX executable segment.out
[ 97%] Built target segment.out
[ 98%] Linking CXX executable testModel.out
[ 98%] Built target testModel.out
[ 98%] Linking CXX executable multiPose.out
[ 98%] Built target multiPose.out
[ 98%] Linking CXX executable pictureRecognition.out
[ 98%] Built target pictureRecognition.out
[ 99%] Linking CXX executable timeProfile.out
[ 99%] Built target timeProfile.out
[100%] Linking CXX executable MNNV2Basic.out
[100%] Built target MNNV2Basic.out
可视化ONNX模型
编译转换工具
注意事项,有版本要求,否则编译不通过或者不可用。
- protobuf (3.0 以上)
- GCC推荐版本4.9以上
依赖 protobuf-c
## 下面的版本是2.5太低了,不行。
# sudo yum install protobuf-c protobuf-c-devel
下载:
wget https://github.com/protocolbuffers/protobuf/releases/download/v3.17.2/protobuf-all-3.17.2.tar.gz
tar xf protobuf-all-3.17.2.tar.gz
./configure
make
sudo make install
结果
$ cd src/.libs/
$ ./protoc --version
libprotoc 3.17.2
编译gcc
sudo yum install centos-release-scl scl-utils-build
sudo sudo yum install devtoolset-7-gcc.x86_64 devtoolset-7-gcc-c++.x86_64 devtoolset-7-gcc-gdb-plugin.x86_64
编译 mnn converter
CC=/opt/rh/devtoolset-7/root/usr/bin/gcc cmake3 -DMNN_BUILD_CONVERTER=true ..
make -j7
sudo make install
结果
[ 99%] Building CXX object tools/converter/CMakeFiles/TestConvertResult.dir/source/TestConvertResult.cpp.o
[ 99%] Linking CXX executable ../../MNNConvert
[ 99%] Built target MNNConvert
[ 99%] Linking CXX executable ../../TestPassManager
[ 99%] Built target TestPassManager
[100%] Linking CXX executable ../../TestConvertResult
[100%] Built target TestConvertResult
查看版本
$ MNNConvert -version
0.2.1.5git
模型转换
本小节将ONNX模型转换为MNN模型
MNNConvert -f ONNX --modelFile asr-model.onnx --MNNModel asr-model.mnn --bizCode biz
结果
MNNConverter Version: 0.2.1.5git - MNN @ 2018


Start to Convert Other Model Format To MNN Model...
[00:28:38] /home/fw/work/2021/03.mnn/mnn/tools/converter/source/onnx/onnxConverter.cpp:30: ONNX Model ir version: 7
Start to Optimize the MNN Net...
inputTensors : [ the_inputs, ]
outputTensors: [ dense_2, ]
Converted Done!
模型打印
使用MNNDump2Json来进行模型打印。
MNNDump2Json asr-model.mnn output.json
结果
{ bizCode: "biz", oplists:
[
{ main_type: Input, main:
{ dims:
[ 0, 0, 200, 1 ]
, dtype: DT_FLOAT, dformat: NCHW }
, name: "the_inputs", outputIndexes:
[ 0 ]
, type: Input, defaultDimentionFormat: NHWC }
,
{ inputIndexes:
[ 0 ]
, main_type: Permute, main:
{ dims:
[ 0, 3, 1, 2 ]
 }
……………………
, outputName:
[ "dense_2" ]
, preferForwardType: CPU, sourceType: ONNX, tensorName:
[ "the_inputs", "adjusted_input7", "adjusted_input7___tr4convolution_output7", "conv2d_1/Relu:0", "batch_norm_output_buffer7", "conv2d_2/Relu:0", "batch_norm_output_buffer6", "batch_normalization_2/cond/Merge:0_pooling0", "conv2d_3/Relu:0", "batch_norm_output_buffer5", "conv2d_4/Relu:0", "batch_norm_output_buffer4", "batch_normalization_4/cond/Merge:0_pooling0", "conv2d_5/Relu:0", "batch_norm_output_buffer3", "conv2d_6/Relu:0", "batch_norm_output_buffer2", "batch_normalization_6/cond/Merge:0_pooling0", "conv2d_7/Relu:0", "batch_norm_output_buffer1", "conv2d_8/Relu:0", "batch_norm_output_buffer", "batch_normalization_8/cond/Merge:0", "batch_normalization_8/cond/Merge:0___tr4reshape_1/Reshape:0", "shape_tensor", "reshape_1/Reshape:0", "dense_1/kernel:0", "dense_10", "dense_1/bias:0", "biased_tensor_name1", "dense_1/Relu:0", "dense_2/kernel:0", "dense_20", "dense_2/bias:0", "biased_tensor_name", "dense_2" ]
, tensorNumber: 0, usage: INFERENCE }
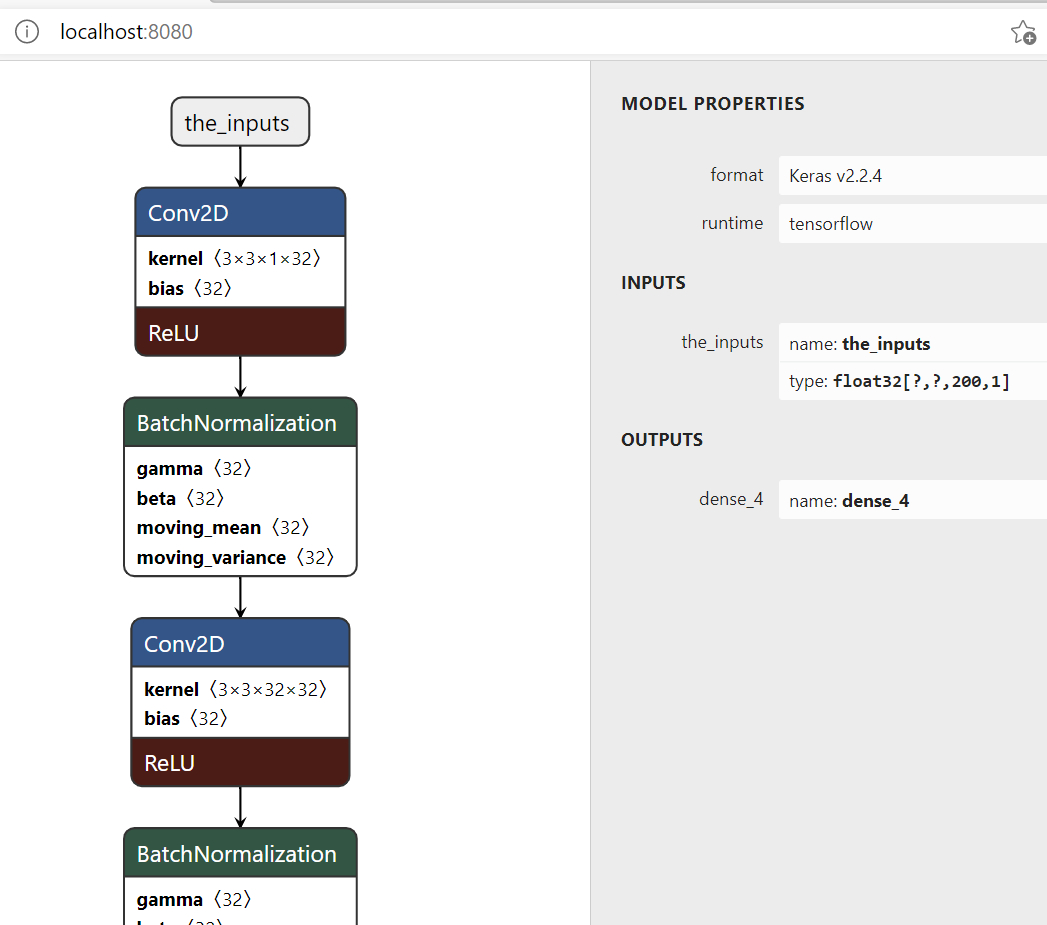
模型可视化
使用netron来进行模型可视化。
安装netron
pip install netron
使用
Python 3.7.10 (default, Feb 26 2021, 13:06:18) [MSC v.1916 64 bit (AMD64)] :: Anaconda, Inc. on win32
Type "help", "copyright", "credits" or "license" for more information.
>>> import netron;
>>> netron.start(None)
Serving at http://localhost:8080
('localhost', 8080)
会打开浏览器,在浏览器中上传模型,可得到结果,示例如下:
模型推理
准备工作
编译
mkdir build
cd build
cmake3 ..
make -j7
结果
[ 98%] Linking CXX executable testModelWithDescrisbe.out
[ 98%] Built target testModelWithDescrisbe.out
[ 98%] Linking CXX executable backendTest.out
[ 98%] Built target backendTest.out
[ 99%] Linking CXX executable mobilenetTest.out
[ 99%] Built target mobilenetTest.out
[100%] Linking CXX executable timeProfile.out
[100%] Built target timeProfile.out
[100%] Linking CXX executable MNNV2Basic.out
[100%] Built target MNNV2Basic.out
执行推理
使用MNN推理时,有两个层级的抽象,分别是解释器Interpreter和会话Session。Interpreter是模型数据的持有者;Session通过Interpreter创建,是推理数据的持有者。多个推理可以共用同一个模型,即,多个Session可以共用一个Interpreter。
即一个模型一个Interpreter,在一个Interpreter上可以创建很多个Session。